


Friday, September 26, 2014
BlackBerry Z10 Hard Reset Guide Instructions
This posting about the BlackBerry Z10 Hard Reset Guide or tutorial. If you want to hard reset with your smartphone, follow this instructions:
The first, in your device options, click security options
The second, click general settings
Next step, press the menu key
Ok, further you must click Wipe Handheld
Then, to delete all third-party applications from your device, select the Include third-party applications check box
And then Click Continue
The last step, type blackberry and OK
You can also read about the BlackBerry Z10 Hard Reset Instructions in manual or user guide. In addition in the manual also provide other important information for example about tutorial How do I reset my lost or forgotten BlackBerry ID password?
To reset your password on a computer, visit www.blackberry.com/blackberryid. Click Reset your password. Complete the instructions on the screen. To recover your password on your BlackBerry device, click Forgot Password. Answer your security question and complete the instructions on the screen.
When you follow the steps to reset your password on a computer, the password reset email can only be viewed on a computer and is not delivered to your BlackBerry device. If you follow the steps to reset your password on your device, the password reset email can be delivered to your BlackBerry device.
Download Install Micromax Blow Air to Unlock Shake Unlock App for Any Android Phone
Micromax India yesterday launched a new Smart Phone called as the Canvas 4 which came up with some interesting features which we had listed yesterday in our blog post. One of those feature was the lock Lcd application which allows you to Unlock your Phone by just blowing air onto the Lcd or by just shaking the device.

Just download the APK file from the link given below and then proceed to the installation of this app. Ensure that you have enabled the option to “Allow installation of apps from sources other than the play store” from the Security section of your Phone. Once the app is installed, you would be asked to tap once on the same to Enable it following which you would get the lock Lcd active on your phone.
Download App Directly [From your Smart Phone]
Overall this a interesting application and a useful feature if you are bored with your current locking options. Check out the video above for a small demo of the same to know if this is useful for you or not. Thanks to Keanu for extracting this app from the Canvas 4 ROM.
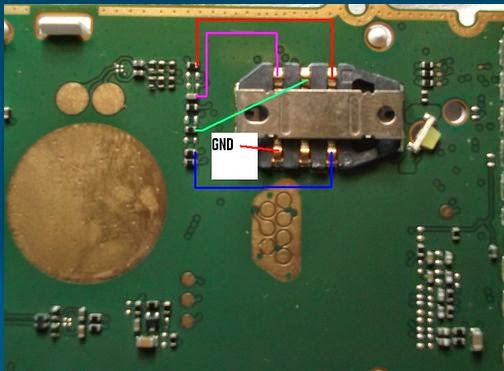
BlackBerry 8520 headset activated mode when making a call solution
BlackBerry 8520 headset activated mode when making a call solution,blackberry
headphone active mode solution when making a call only show display headphone
headphone is opening but same times its not hearing always show headphone fast try
full board tabile lamp 2nd time try my solution see my picture and reheat i hope solve not solve reheat 2nd
replace this ic 100% solve your problem.

Many time tested this solution try this way i hope solved your problem.
Nokia 1800 1616 1280 dead solution
Mobile phone dead means Mobile phone not on problem.Many may be nokia 1800 1616 and 1280 has dead.When any body face this problem then first check battery or check with other battery next check battery connector if they are ok but problem still then first check your phone with hwk software connect phone with hwk box select model then click info on hwk software if you see lcd unknown in the check result.then replace lcd or check lcd ways view below hwk result.

You may also like :
How to repair dead phone
If you see info result is ok but phone phone dead then check hardware side.If you see info result is not showing then flash your phone.
You may also like :
How to repair dead phone
Huawei Ascend P2 Hard Reset Instructions
The Huawei Ascend P2 measuring 136.2 x 66.7 x 8.4 mm. It has 4.7 inches, IPS LCD capacitive touchscreen, with 720 x 1280 pixels resolution and support 16M colors. Its powered by Quad-core 1.5 GHz processor with Huawei K3V2 chipset and runs on Android 4.1.2 (Jelly Bean) operating system. This smartphone equipped with 13 MP camera, available 1 GB of RAM also support for GSM, HSDPA, LTE network. If you owner of this smartphone, the following information about the Huawei Ascend P2 Hard Reset Instructions:
The first, power off your Huawei Ascend P2 smartphone
Then, press and hold both the volume up and volume down keys
Next step press the power key
With the phone turned off, further press both Volume UP + SEND + POWER on Huawei Ascend P2
Next tutorial, from the recovery menu select wipe data/factory reset with volume button, Go to Yes - delete all user data
Ok, and then go to wipe cache partition > Yes wipe cache (All data will be lost!)
If your phone is responding to screen input, then open Settings from the Applications menu
Then you must Tap Backup & reset > Factory data reset
Click Reset phone and then Erase everything to format your phone
Thursday, September 25, 2014
Iphone 3gs full short or dead solution 100 tested
.:: Iphone 3gs full short or dead change this marked IC ::..

Nokia 5530 No Lcd Light Problem Solution 100 Tested
Nokia 5530 Xpress music light solution.


Sony Xperia S Tips and Tricks
Here are some How Tos for your Sony Xperia S. These How Tos are still not yet complete and I am still working on the others. Visit this site often for the other how tos.
Follow these steps on how to reset the Sony Xperia S:
- From your Home Lcd, tap the Menu icon.
- Tap Settings, then select Privacy.
- Tap Factory data reset.
- Tap Reset phone.
- Then you need to confirm by tapping Erase everything.
How to Import Contacts From Old Phone to New Phone (on Sony, iPhone, Samsung, HTC and Nokia)
Contacts is very important for everyone of us. We cant connect to our friends without a contact number. If you have a new phone, saving contacts on the phone one by one is so hassle. But now, theres an easy way how to transfer or import your contacts from your old phone to your new phone.
Use your PC to transfer contacts to your new phone. This process is applicable in several phone brands, including iPhone, Samsung, HTC and Nokia.
You just need an Internet Connection on your PC, your old and new phone and their own USB cable.
If you are not prompted with a pop-up window to install the PC Companion, you can also download the PC Companion here.
Use your PC to transfer contacts to your new phone. This process is applicable in several phone brands, including iPhone, Samsung, HTC and Nokia.
You just need an Internet Connection on your PC, your old and new phone and their own USB cable.
Then you need to install the PC Companion program. This is a free application and the installation files are already saved on your new phone. This program can also be used in updating your phone software.
Please note that if you are using the Microsoft Windows 7 operating system on your PC, make sure that the AutoPlay setting is enabled.
To check your settings:
Click Start > Control Panel, then type "autoplay" on the search box. Click the AutoPlay, and mark the check box Use AutoPlay for all media and devices.
Installing the PC Companion:
Installing the PC Companion:
- Turn on your new Phone and connect it to your PC.
- On your new Phone, tap "Install" to install PC Companion on the PC.
- On your computer, if a pop-up window that appears notifies you about available PC Software, select Run Startme.exe.
- Then click Install to start the installation and then follow the instructions to complete the installation.
If you are not prompted with a pop-up window to install the PC Companion, you can also download the PC Companion here.
Transferring your contacts to your new phone:
- Make sure that PC Companion is installed on your PC.
- Open the PC Companion application on your PC.
- Then click Contacts Setup and folow the instructions to transfer your contacts.
How to Save Battery Life on Sony Xperia S
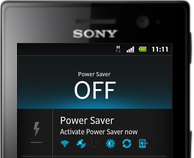
Sony Xperia S lets you manage power consuming apps with its power saving mode. This feature lets you customize the settings within each power saving mode which suits the way you use your phone. You can turn off handset functions like wi-fi and Lcd brightness right on this power saving mode. Heres how you can activate Power Saver on Sony Xperia S so you can save your devices battery life.
1. On your devices homeLcd, tap on

2. Scroll and tap on Power Saver icon.The Power Saver menu will then be displayed.
3. Tap on the Power Saver option to see the Power Save mode settings menu with the handset functions.
4. On the list, choose which functions you would like to turn on/off when youre on power saver mode.
5. Tap on Done.
6. After youve chosen what functions to turn on/off when on power saver mode, tap on the Power Saver icon to activate it.
Now you have just activated the power saver mode. A power saver icon will then appear at the top of the display. Youll be able to save your phones battery life. To deactivate the power saving mode, follow steps 1 and 2. And tap the icon next to the active power saving mode to turn it off.
Follow also these tips:
• Lessen the Lcd brightness and the Lcd lock timeout.
• Turn down your device volume with the volume keys.
• Close any apps or features when you are done using it so they will not continuously running in the background.
• Turn off the network connection if you are out of range so that your device will stop searching for a network signal. Or you may switch your settings to Airplane mode.
• Shut down your device when you do not use it for a long time.
• You should use the latest version of the software update. Software updates improves some features and fixes some bugs on the previous software version.
How to Start a Conference Call on Sony Xperia S
How to Set Up Your Facebook Account on Sony Xperia S
Keeping your devices secure from any intrusion is indeed a challenge. With most people exposed to online activities, unconsented distribution of information/videos/photos due to hacking, are easily spread and goes viral. So, to prevent any leak on yoursmartphone, passwords or patterns are ready to be activated in it to give a little assurance that your device is somehow secure. Sony Experia Ss Face Unlock feature is perhaps one of the coolest, so far, to keep your phone protected. If youve got one, here are the steps on how to set up this feature. Take note that this feature is lesssecure than a Lcd lock pattern or PIN especially if someone looks similar to you. For best result, make sure that youre in an indoor area that is well lit and hold your phone at an eye level before you capture a photo of your face.
To activate Face Unlock feature:
1. On your devices home Lcd, tap on Application Lcd icon.
2. Then go to Settings.
3. Under Security, tap on Screen Lock.
4. Tap on Face Unlock. Follow the succeeding steps in your phone so you can capture a photo of your face.
5. After youre done taking a photo of your face, set up Lcd lock Pattern or PIN as a back up method to unlock your Lcd in case youll not be recognized by your device.
To unlock the Lcd using Face Unlock:
1. Activate the Lcd.
2. Look at your phone at the same angle when you took your Face Unlock photo.
With conference call you can talk to two or more parties simultaneously right thru your phone. Adding multiple participants even if your on a call is just few taps away with Sony Xperia S. Heres how to create a conference call.
1. If youre on an ongoing call, tap .
.
2. Then dial the number of the second participant and tap .
.
3. When the second participant answers the call, the first call is put on hold.
4. Tap on to start the conference call. Repeat the same steps to add more participants to the conference call.
To have a private conversation with one of the participants
1. Tap the button showing the number of participants during the ongoing conference call.
2. Then tap on the name of the participant you wish to talk privately.
3. To end the conversation and return to the conference call, tap
To release a participant during the ongoing conference call
1. Tap the button showing the number of participants during the ongoing conference call.
2. Then tap next to the participant you want to release from the call.
To end the conference call
1. During the conference call, just tap End Conference Call.
1. If youre on an ongoing call, tap
.2. Then dial the number of the second participant and tap
.3. When the second participant answers the call, the first call is put on hold.
4. Tap on
to start the conference call. Repeat the same steps to add more participants to the conference call.To have a private conversation with one of the participants
1. Tap the button showing the number of participants during the ongoing conference call.
2. Then tap on the name of the participant you wish to talk privately.
3. To end the conversation and return to the conference call, tap
To release a participant during the ongoing conference call
1. Tap the button showing the number of participants during the ongoing conference call.
next to the participant you want to release from the call.To end the conference call
1. During the conference call, just tap End Conference Call.
We simply cant get enough of Facebook. And this social networking giant made sure that they still exist even on your smartphones. Now you can set up a Facebook Account right on your Xperia phone which will give you easy navigation on Facebook. Heres how you can set up your Facebook account to work on your Xperia device.
1. On your devices homeLcd tap on
2. Then tap on Settings and go to Accounts & sync.
3. The Active auto-sync checkbox should be marked to make sure that applications can synchronise data automatically.
4. Tap on Add Account and then Facebook.
5. Just follow the registration wizard to create an account or you can sign in if you already have one.
6. Once youre done, select a synchronisation option for your account and tap on Finish.
Your Facebook account is now set up to work on your phone.
How to Use the Face Unlock Feature on Sony Experia S
To activate Face Unlock feature:
1. On your devices home Lcd, tap on Application Lcd icon.
2. Then go to Settings.
3. Under Security, tap on Screen Lock.
4. Tap on Face Unlock. Follow the succeeding steps in your phone so you can capture a photo of your face.
5. After youre done taking a photo of your face, set up Lcd lock Pattern or PIN as a back up method to unlock your Lcd in case youll not be recognized by your device.
To unlock the Lcd using Face Unlock:
1. Activate the Lcd.
2. Look at your phone at the same angle when you took your Face Unlock photo.
World 1St Samsung note3 n9005 region unlock here Guide
1)ROOT THE PHONE FIRST
CF ROOT DOWNLOAD
AFTER DOWNLOAD EXTRACT THE RAR FILE ON DESKTOP
OPEN Odin3-v1.85
SELECT "CF-Auto-Root-hlte-hltexx-smn9005.tar.md5" ON "PAD" AREA
PUT THE PHONE DOWNLOAD MODE
CONNECT USB CABLE
MAKE SURE ODIN DETECETED COM THEN USE "START"BUTTON
WAIT A MINUTES,PHONE WILL BE RESTARTED
2)DOWNLOAD N9005 UNLOCK APK RAR THEN EXTRACT
COPY THE N9005 UNLOCK APK FROM PC THEN PASTE PHONE MASS MEMORY
THEN INSTALL THE APK,AFTER INSTALL OPEN "REGION LOCK AWAY"
RUN "REGION UNLOCK"
WAIT A SECONDS AFTER THE PROCESS REBOOT THE PHONE
PHONE SUCESSFULY UNLOCKED
@@@ MI7, MJ1, MJ3 firmwares Only
@Author:Chainfire
Thanks Chainfire
PASSWORD: GPGeMMC
Wednesday, September 24, 2014
Get Your Smart Phone Apps and Solve Instant Problem
Get Your Smart Phone Apps and Solve Instant Problem : There are many kinds of Smart Phone and iPhone in the world. Many kinds of apps also available in Smart Phone and iPhone. Smart Phone or iPhone is always compatible with full multimedia, music, games and high speed communication. To establish a secure communication some apps are available in iPhone and Smart Phone world. The popularity of mobile apps has continued to rise, as their usage has become increasingly prevalent across mobile phone users at home and abroad. Most of the apps are created by Android.
Necessary Apps list are given below :
Necessary Apps list are given below :
BD Data Plan : This apps will help you to know all mobile operator Internet package.
Internet Speed Meter : This apps will help you to know everyday usage of internet browsing.
Any Share : This apps will help you to share anything from one mobile to another with high speed.
BMI Calculator : This apps will help you to know about height and weight of your body smoothly.
GPH Speed o Meter : This apps will you to specify the speed of your vehicle.
MAP My Work : This apps will help you to create map with your movement.
TubeMat : This apps will help you to download video from YouTube easily.
Talking Tom: This apps will help you to create a little bit fun with a talking Cat.
Skype : This apps will help you to make conversation with video conference.
Mobile Care : This apps will help you to to recover virus problem and other problem.
DU Speed Booster : This apps will help you to speed up mobile performance.
Expense Manager : This apps will help you make total account of everyday expenditure.
You Can Download These Apps from the following store :
- Amazon App store
- BlackBerry World
- Google Play
- Nokia Store
- Windows Phone Store
- Windows Store
- App Store
- Samsung Apps Store
More Apps are available with iPhone, Smart Phone, Android Phone.

Nokia 105 sim problem solution
This is solution of nokia 105 insert sim problem solution.this is very easy solution.If you face this problem then first check your phone other good sim card if problem still then repair your problems following below picture.
Gpg Hwk Dongle Repair rar
1. run mspfet.exe
2. Click on setting and do select setting as shown setiings.jpg then press ok
3. Select MSP430F11X1
3. Click on erase
4. Then open the file hwk_repair.bin and click on prog
Your hwk will be ok
2. Click on setting and do select setting as shown setiings.jpg then press ok
3. Select MSP430F11X1
3. Click on erase
4. Then open the file hwk_repair.bin and click on prog
Your hwk will be ok
Adjust setting 01

setting 02

Download zone
File name: Gpg_Hwk_Dongle_Repair.rarSize: 1.69 Mb (1,773,776 b)
Download: http://depositfiles.com/files/9vrxoiad1
Symphony t44 charging solution
Symphony t44 is very nice phone it has dual sim standby,fm radio and many other things.It is very popular phone of symphony. May be charging problem on this phone.So now I share this phones charging solution.
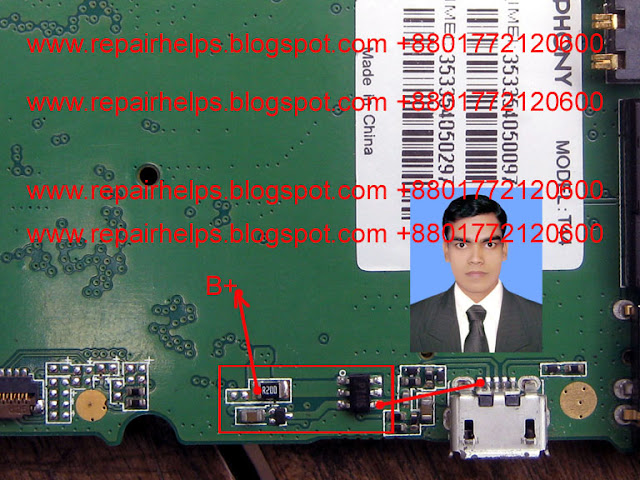
How to do this : This phones charging port is five pin micro usb port.This type pot is very weak so most possibility broken it.Maximum time may be charging problem for this reason of this phone.When broken charging port then less printed of charging line.Then its repair very hard so I make this solution.Repair this problem step by step following this picture.

Samsung Galaxy S3 Touch Screen Not Working fix problem

Tuesday, September 23, 2014
Nokia 5530 fake charging charging not save Problem with Jumper Solution
Nokia 5530 Xpress music fake charging
charging not save solution.
![Nokia]()
Read More..
charging not save solution.

LiquidSmooth Rom For Samsung Galaxy S i9000
Feautures found Over:-
Google GCC 4.7 Toolchain
 O3
 Strict-Aliasing (Linaro)
 C++11 Mode
 Optimized String Handling Routines (Linaro/Sony)
 Misc other Linaro and Code Aurora Optimaztions
 Customizable lockLcd buttons and sliders
 Chronus clock widget
 Customizable hardware and software keys
 Transparent navbar and status bar
 Customizable navbar ring
 Navigation bar widgets
 Customizable power menu
 Notification power widget
 Customizable quicksettings panel
 Statusbar mods
 Theme engine
 Quiet hours
 Volume rocker music controls
 Full Rotation
 Customizable battery and notification light
How To Flash The Rom:-
[So Here am I with for the one You waiting For and Scrolling too.. Now Ill give u a perfect Way to Flash this Custom Rom... You would be Thinking this one Would be as Same as the one which Normally others are but not Like it Now.!! This One is Quite Different from Others.]
- If You are new To the Custom Roms or Coming From any Other Stock Rom.. You Require To Root Your Device First To Avoid any Interruption from the Android Administrational Setting...
- [Since You have Rooted Your Device You would be knowing how to Operate Your Device into recovery Mode... So Now lets Head Towards our Next Step.] Navigate towards.. Format Data... Clear Cache Partiion.. Clear Dalvik Cache...
- After Clearing Up all the Data From Your Handset.. Navigate towards Apply Update from Sd Card and Select the LiquidSmooth.zip File and Press Home Button...
- After the LiquidSmooth.zip is flashed Select the GApps.zip File and Press Home Button to Flash it Up...[This was Done to get The Latest Android features Up to your Device..]
- It May Take up Few Minutes.. Please Be Patient. After the Zip is Flashed.. Select Reboot System Now..
Sony Xperia L Tips and Tricks
How to Factory Reset (Hard Reset) Sony Xperia L
We have our own reasons why we factory reset our device. Maybe we want to delete all the files and restore the device to its original state. It could also be the device may be malfunctioning or so slow and it needs to be reset.
Restoring the default settings or factory reset your Sony Xperia L will delete all your files. It is recommended to backup your important files on your computer before attempting to reset your device.
How To Reset Your Sony Xperia L:
Hard Reset:
1. If your phone is turned off, just press and hold the Volume Up and Volume Down buttons.
2. Then press and release the Power button (just keep on holding the volume buttons). There should a menu will appear on your phone.
3. Press the Volume down button to navigate to the Recovery option. Press the Volume Up to select (if that doesnt work, use the Power button to select).
4. An Android logo will appear. Press the Volume Down and Volume Up button together and a recovery menu should appear. Use the Volume buttons to move to the Wipe data/Factory reset option and then press Power to select.
5. Use the Volume Down key to choose Yes and press the Power button again to select.
How to Save Battery on Sony Xperia L
Battery Life depends on how you use your device. For your Sony Xperia L device, if you want to save your battery to last longer hours, you may need to adjust your settings. Follow these suggestions:
• Turn on the power-saving option on the device. Then lessen the Lcd brightness and the Lcd lock timeout. On the HomeLcd, tap on Menu icon. Select Settings > Power management.
- Use the Stamina mode and Low battery mode features.
- To activate the STAMINA mode: While you are in the Power management, tap on Point icon next to STAMINA mode, then tap Activate.
• Turn down your device volume with the volume keys.
• Close any apps or features when you are done using it so they will not continuously running in the background.
• Turn off the network connection if you are out of range so that your device will stop searching for a network signal. To turn off the network go to Settings and turn off the Bluetooth and Wi-Fi.
• You should use the latest version of the software update. Software updates improves some features and fixes some bugs on the previous software version.
• Adjust your brightness level to low.
• Turn off the camera flash.
• If you have any live wallpaper, Disable it.
• Set the synchronization application to manual. You can also choose the automatic, but increase the synchronization intervals.
• If you want to listen to music, use the Sony original hands free device. It demand less battery power than your devices own loudspeakers.
How to Start the Smart Connect Application on Sony Xperia L
Wouldnt it be nice if youre phone automatically plays your song list right when you step in your car? Or what about letting you show your whole day agenda the moment you arrive at your work table between 8-9am? These are just examples on how Sony Xperia Ls Smart Connect app works. With this app, you can set an event to happen on your device at certain times or what will happen when you connect/disconnect accessories like headset or charger. Hereshow to use it.
1. On your devices home Lcd, tap on Menu icon
2. Look for Smart Connect and tap on it.
3. If its your first time opening the said app, tap on OK to close the introduction Lcd.
4. Go to Events tab and tap on the plus (+) icon.
5. Type in a name for the event and tap on Create.
6. Under When, add either an accessory ( like what happens on your device when you connect your headset) or a time interval or could be both.
7. Under Do This, add what you want to happen on your device.
8. Under At the End, add what you want to happen to your device when you disconnect your accessory or when the time interval ends.
9. Press on Back Arrow to save the event.
How to Transfer Files Using Media Transfer Mode Via Wi-Fi on Sony Xperia L
Transferring files in SonyXperia L is now made easy by using the Media Transfer Mode. You can easily transfer files between your device and other MTP compatible devices such as computer, using a Wi-Fi connection. But before you can transfer files wirelessly, you will need to pair both devices.
Note: You will need a Wi-Fi enabled devices that supports Media transfer such as a computer running Microsoft, Windows Vista orWindows 7.
To pair your device with the computer:
These steps will work only on Windows 7 OS and the computer is connected to the Wi-Fi Access point via network cable.
To connect paired devices wirelessly in Media Transfer Mode:
If you want to disconnect, just tap on the paired device and tap Disconnect.
If you want to remove the paired device, tap on the paired device you want to remove and select Forget.
How to Add a Shortcut on Sony Xperia L HomeLcd
Just like a desktop, it also works best on any smartphones to add a shortcut on a homeLcd. This r somehow makes navigation, especially to important files/apps, more accessible. Its less hassle and less tapping. Sony Xperia L definitely allows you to make your device experience stress-free by adding a shortcut to important apps on your homeLcd. Heres how to do it.
1. On your devices homeLcd, touch and hold and empty area until the device vibrates.
2. After doing so, tap on Apps.
3. Then go to Shortcuts and select a shortcut.
4. Or another option, just go directly to the Application Lcd and touch and hold the application.
How to Add and Resize Widgets on Sony Xperia L
Adding Widgets on your HomeLcd will help you improve your productivity in using your Sony Xperia L. If you dont know what widgets means, Widgets are small applications that you can directly use on your HomeLcd. These will serve as your shortcut icon so will no longer need to access your Menu.
Follow these steps on how to add widgets on your HomeLcd.
How to resize a Widget:
How to Change Time & Date on Sony Xperia L
In some devices you can only change the Timezone and not the specific time and date. But in Sony Xperia L, you have an option whether to set the time in automatic or to manually set the time.
Follow these steps on how to change the time and date on your device:
To manually set the date:
To manually set the time:
If you want to change the timezone:
How to Link Duplicate Contacts on Sony Xperia L
Duplicate contacts usually happens when you import your old contacts to your new device or when you synchronize your contacts with the other account. On your Sony Xperia L, you can avoid dupicate contacts and instead link these two to create a single entry. If you happen to link two contacts by mistake, you can separate them again. Heres how you can link two contacts.
1. On your devices homeLcd, tap on .
.
2. Tap on and tap the contact you want to link with another contact.
3. Press on and tap Link contact.
4. And tap the contact whose information you want to be linked with the first one. Tap OK to confirm. The first contact no longer appears on your contact list but is merged with the second contact.
Now if you mistakenly linked two contacts
1. Tap on on your homeLcd and then tap on.
2. Then tap on the linked contact you want to edit.
3. And tap on . Tap on Unlink contact on the list and tap on OK to confirm.
How to Transfer Contacts from Sim Card or Memory Card to Sony Xperia L
Contacts is very important for everyone of us. We cant connect to our friends without a contact number. If you have a new phone, saving contacts on the phone one by one is so hassle. But if you have save your contacts on a Sim Card or Memory Card, then you can transfer your contacts from your SIM Card or Memory Card to your Sony Xperia L.
How to transfer contacts from a SIM card to your Xperia L:
How to transfer contacts from a memory card to your Xperia L:
How to Import Contacts From Old Phone to New Phone (on Sony, iPhone, Samsung, HTC and Nokia)
Read More..
We have our own reasons why we factory reset our device. Maybe we want to delete all the files and restore the device to its original state. It could also be the device may be malfunctioning or so slow and it needs to be reset.
Restoring the default settings or factory reset your Sony Xperia L will delete all your files. It is recommended to backup your important files on your computer before attempting to reset your device.
How To Reset Your Sony Xperia L:
- On your Home Lcd, tap Apps.
- Go to Settings, and select Backup & reset.
- Tap on Factory data reset. (If you want to delete all your files which is saved on your internal storage, then mark the Erase Internal Storage checkbox.)
- Then Reset phone.
- Confirm by tapping Erase everything.
- You just need to wait while your phone deleting your files and restoring your settings to default.
Hard Reset:
1. If your phone is turned off, just press and hold the Volume Up and Volume Down buttons.
2. Then press and release the Power button (just keep on holding the volume buttons). There should a menu will appear on your phone.
3. Press the Volume down button to navigate to the Recovery option. Press the Volume Up to select (if that doesnt work, use the Power button to select).
4. An Android logo will appear. Press the Volume Down and Volume Up button together and a recovery menu should appear. Use the Volume buttons to move to the Wipe data/Factory reset option and then press Power to select.
5. Use the Volume Down key to choose Yes and press the Power button again to select.
How to Set Up Voicemail Service on Sony Xperia L
Voicemail services depends on your subscription plan with your service provider. This feature allows caller to leave voice messages on your phone whenever you cant pick up. Your voicemail number may be found on your sim card or you can get it directly from your service provider. Here are the steps to set up voicemail service on Sony Xperia L.
To set up your voicemail number:
1. On your devices homeLcd, tap on Menu icon to enter your voicemail number.
2. Go to Settings menu.
3. Select Call Settings > Voicemail and choose Voicemail Settings.
4. Tap on Voicemail number so you can enter your designated voicemail service number.
5. And lastly tap on OK.
To call your voicemail service number:
1. On your homeLcd, tap on the Menu icon.
2.Look for Phone and tap it.
3. And touch and hold for a few seconds the number 1.
Voicemail services depends on your subscription plan with your service provider. This feature allows caller to leave voice messages on your phone whenever you cant pick up. Your voicemail number may be found on your sim card or you can get it directly from your service provider. Here are the steps to set up voicemail service on Sony Xperia L.
To set up your voicemail number:
1. On your devices homeLcd, tap on Menu icon
to enter your voicemail number.2. Go to Settings menu.
3. Select Call Settings > Voicemail and choose Voicemail Settings.
4. Tap on Voicemail number so you can enter your designated voicemail service number.
5. And lastly tap on OK.
To call your voicemail service number:
1. On your homeLcd, tap on the Menu icon
.2.Look for Phone and tap it.
3. And touch and hold for a few seconds the number 1.
Battery Life depends on how you use your device. For your Sony Xperia L device, if you want to save your battery to last longer hours, you may need to adjust your settings. Follow these suggestions:
• Turn on the power-saving option on the device. Then lessen the Lcd brightness and the Lcd lock timeout. On the HomeLcd, tap on Menu icon. Select Settings > Power management.
- Use the Stamina mode and Low battery mode features.
- To activate the STAMINA mode: While you are in the Power management, tap on Point icon next to STAMINA mode, then tap Activate.
• Turn down your device volume with the volume keys.
• Close any apps or features when you are done using it so they will not continuously running in the background.
• Turn off the network connection if you are out of range so that your device will stop searching for a network signal. To turn off the network go to Settings and turn off the Bluetooth and Wi-Fi.
• You should use the latest version of the software update. Software updates improves some features and fixes some bugs on the previous software version.
• Adjust your brightness level to low.
• Turn off the camera flash.
• If you have any live wallpaper, Disable it.
• Set the synchronization application to manual. You can also choose the automatic, but increase the synchronization intervals.
• If you want to listen to music, use the Sony original hands free device. It demand less battery power than your devices own loudspeakers.
Wouldnt it be nice if youre phone automatically plays your song list right when you step in your car? Or what about letting you show your whole day agenda the moment you arrive at your work table between 8-9am? These are just examples on how Sony Xperia Ls Smart Connect app works. With this app, you can set an event to happen on your device at certain times or what will happen when you connect/disconnect accessories like headset or charger. Hereshow to use it.
1. On your devices home Lcd, tap on Menu icon
2. Look for Smart Connect and tap on it.
3. If its your first time opening the said app, tap on OK to close the introduction Lcd.
4. Go to Events tab and tap on the plus (+) icon.
5. Type in a name for the event and tap on Create.
6. Under When, add either an accessory ( like what happens on your device when you connect your headset) or a time interval or could be both.
7. Under Do This, add what you want to happen on your device.
8. Under At the End, add what you want to happen to your device when you disconnect your accessory or when the time interval ends.
9. Press on Back Arrow
Transferring files in SonyXperia L is now made easy by using the Media Transfer Mode. You can easily transfer files between your device and other MTP compatible devices such as computer, using a Wi-Fi connection. But before you can transfer files wirelessly, you will need to pair both devices.
Note: You will need a Wi-Fi enabled devices that supports Media transfer such as a computer running Microsoft, Windows Vista orWindows 7.
To pair your device with the computer:
- Check if the media transfer mode of your device is enabled. It is normally enabled by default.
- Using the USB cable, connect your device to a computer.
- On your computer, once the name of your device appear, click on Network Configuration and just follow the steps on how to pair the computer.
- After pairing, safely disconnect your device from your computer.
These steps will work only on Windows 7 OS and the computer is connected to the Wi-Fi Access point via network cable.
To connect paired devices wirelessly in Media Transfer Mode:
- First things first, check if the media transfer mode is enabled.
- On your Home Lcd, tap on the Menu icon.
- Select Settings > Xperia > USB connectivity.
- Then tap the paired device that you want to connect to under Trusted devices.
- Tap connect.
If you want to disconnect, just tap on the paired device and tap Disconnect.
If you want to remove the paired device, tap on the paired device you want to remove and select Forget.
How to Add a Shortcut on Sony Xperia L HomeLcd
Just like a desktop, it also works best on any smartphones to add a shortcut on a homeLcd. This r somehow makes navigation, especially to important files/apps, more accessible. Its less hassle and less tapping. Sony Xperia L definitely allows you to make your device experience stress-free by adding a shortcut to important apps on your homeLcd. Heres how to do it.
1. On your devices homeLcd, touch and hold and empty area until the device vibrates.
2. After doing so, tap on Apps.
3. Then go to Shortcuts and select a shortcut.
4. Or another option, just go directly to the Application Lcd and touch and hold the application.
Adding Widgets on your HomeLcd will help you improve your productivity in using your Sony Xperia L. If you dont know what widgets means, Widgets are small applications that you can directly use on your HomeLcd. These will serve as your shortcut icon so will no longer need to access your Menu.
Follow these steps on how to add widgets on your HomeLcd.
- Tap and hold an empty area on your Home Lcd until your device vibrates.
- There should an option appear, tap on Widgets.
- Select the widget and tap on it you want to add.
- There are some widgets that are resizeable, you can expand them to view the content more on your HomeLcd.
How to resize a Widget:
- Tap and hold the widget you want to resize until it magnifies and the device vibrates. You can tell if the widget is resizeable if the highlighted frame and resizing dots appear.
- You just need to Drag the dots for your preferred size.
- Then tap anywhere on the HomeLcd to confirm the new size of the widget.
How to Change Time & Date on Sony Xperia L
In some devices you can only change the Timezone and not the specific time and date. But in Sony Xperia L, you have an option whether to set the time in automatic or to manually set the time.
Follow these steps on how to change the time and date on your device:
To manually set the date:
- On your Home Lcd, tap the Menu icon.
- Select Settings, then tap Date & Time.
- You need to uncheck the Automatic date & time. If it is set to automatic.
- Then tap on Set date, and adjust the date by scrolling up and down.
- To confirm the changes, tap Done.
To manually set the time:
- On your Home Lcd, tap the Menu icon.
- Select Settings, then tap Date & Time.
- You need to uncheck the Automatic date & time. If it is set to automatic.
- Then tap on Set time, and adjust the time by scrolling up and down.
- To confirm the changes, tap Done.
If you want to change the timezone:
- On your Home Lcd, tap the Menu icon.
- Select Settings, then tap Date & Time.
- You need to uncheck the Automatic date & time. If it is set to automatic.
- Then tap on Select time zone.
- Find your preferred time zone in the option.
Duplicate contacts usually happens when you import your old contacts to your new device or when you synchronize your contacts with the other account. On your Sony Xperia L, you can avoid dupicate contacts and instead link these two to create a single entry. If you happen to link two contacts by mistake, you can separate them again. Heres how you can link two contacts.
1. On your devices homeLcd, tap on
.2. Tap on
and tap the contact you want to link with another contact.3. Press on
and tap Link contact.4. And tap the contact whose information you want to be linked with the first one. Tap OK to confirm. The first contact no longer appears on your contact list but is merged with the second contact.
Now if you mistakenly linked two contacts
on your homeLcd and then tap on.2. Then tap on the linked contact you want to edit.
3. And tap on
. Tap on Unlink contact on the list and tap on OK to confirm.How to Transfer Contacts from Sim Card or Memory Card to Sony Xperia L
Contacts is very important for everyone of us. We cant connect to our friends without a contact number. If you have a new phone, saving contacts on the phone one by one is so hassle. But if you have save your contacts on a Sim Card or Memory Card, then you can transfer your contacts from your SIM Card or Memory Card to your Sony Xperia L.
How to transfer contacts from a SIM card to your Xperia L:
- On your devices homeLcd, tap on the Menu icon .
- Then tap on the Person icon or Contacts.
- Press the Three Vertical Dots, and select Import contacts > SIM card.
- If you have set up a synchronization account, then you can choose to add the SIM card contacts under that account. Or you may choose to only use the contacts on your device.
- If you want to import all the contacts, tap Import all.
- If you want to select which contact to transfer, you just need to find and tap on the contact.
How to transfer contacts from a memory card to your Xperia L:
- On your devices homeLcd, tap on the Menu icon .
- Then tap on the Person icon or Contacts.
- Press the Three Vertical Dots, and select Import contacts > SD card.
- Choose the option you preferred if you have set up a synchronization account. Whether to add the imported contacts under that account or on your device.
- If you have more than one vCard file on the SD card, there should be a list appear on the different batches of contacts. Just select the batch you want to import.
How to Import Contacts From Old Phone to New Phone (on Sony, iPhone, Samsung, HTC and Nokia)
Contacts is very important for everyone of us. We cant connect to our friends without a contact number. If you have a new phone, saving contacts on the phone one by one is so hassle. But now, theres an easy way how to transfer or import your contacts from your old phone to your new phone.
Use your PC to transfer contacts to your new phone. This process is applicable in several phone brands, including iPhone, Samsung, HTC and Nokia.
You just need an Internet Connection on your PC, your old and new phone and their own USB cable.
If you are not prompted with a pop-up window to install the PC Companion, you can also download the PC Companion here.
How to Screen Mirror Sony Xperia L to Show the Screen on a TV
The Screen Mirroring will allow you to show the Lcd of your device on a TV or other large display without using a cable connections. It uses the Wi-Fi Direct technology that create a wireless connection between two devices. You can also use this feature to listen to music from your phone via the TVs speakers.
How to mirror the Lcd of your phone on a TV:
1. First you need to turn on the Lcd mirroring function on your TV. Just follow the instructions in the User Guide of your TV.
2. From your Home Lcd, tap on the Menu icon
3. Select on Settings, and tap Xperia™.
4. Choose Screen mirroring.
5. Tap to turn on the Screen mirroring and select a device.
Note: The TV that you want to connect with must support Lcd mirroring for the above described functionality to work. If it does not support, then you can try the Throw feature. Go to Settings > Throw feature.
How to Activate Camera App and Play Tracks on a LockLcd on Sony Xperia L
LockLcds dont normally allow users to launch any apps or even take photos. We still need to unlock our Lcds to use certain apps on our handset. But with Sony Xperia L, you can take photos, record videos and play tracks without unlocking the Lcd. Heres how you can enjoy this feature on your Sony Xperia L.
To take a photo on a lockLcd
1. Activate first your Lcd by briefly pressing the power key
2. Now activ the camera app by dragging the camera icon to the left across the Lcd.
3. And tap to take photos or record videos without unlocking your Lcd.
To play an audio on a lockLcd
1. Activate first your Lcd by briefly pressing the power key.
2. Now to display the music player controls, drag to the right across the Lcd.
3. And tap to play a track on a lockLcd.
To pause an audio track from the lockLcd
1. Activate first your Lcd by briefly pressing the power key.
2. When the music player controls appear, tap to pause the track.
To change the currently playing audio track on a lockLcd
1. Activate first your Lcd by briefly pressing the power key.
2. Then tap or
or when the music player controls appear.
How to Share Contacts Using NFC on Sony Xperia L
Use your PC to transfer contacts to your new phone. This process is applicable in several phone brands, including iPhone, Samsung, HTC and Nokia.
You just need an Internet Connection on your PC, your old and new phone and their own USB cable.
Then you need to install the PC Companion program. This is a free application and the installation files are already saved on your new phone. This program can also be used in updating your phone software.
Please note that if you are using the Microsoft Windows 7 operating system on your PC, make sure that the AutoPlay setting is enabled.
To check your settings:
Click Start > Control Panel, then type "autoplay" on the search box. Click the AutoPlay, and mark the check box Use AutoPlay for all media and devices.
Installing the PC Companion:
Installing the PC Companion:
- Turn on your new Phone and connect it to your PC.
- On your new Phone, tap "Install" to install PC Companion on the PC.
- On your computer, if a pop-up window that appears notifies you about available PC Software, select Run Startme.exe.
- Then click Install to start the installation and then follow the instructions to complete the installation.
If you are not prompted with a pop-up window to install the PC Companion, you can also download the PC Companion here.
Transferring your contacts to your new phone:
- Make sure that PC Companion is installed on your PC.
- Open the PC Companion application on your PC.
- Then click Contacts Setup and follow the instructions to transfer your contacts.
How to Screen Mirror Sony Xperia L to Show the Screen on a TV
The Screen Mirroring will allow you to show the Lcd of your device on a TV or other large display without using a cable connections. It uses the Wi-Fi Direct technology that create a wireless connection between two devices. You can also use this feature to listen to music from your phone via the TVs speakers.
How to mirror the Lcd of your phone on a TV:
1. First you need to turn on the Lcd mirroring function on your TV. Just follow the instructions in the User Guide of your TV.
2. From your Home Lcd, tap on the Menu icon
3. Select on Settings, and tap Xperia™.
4. Choose Screen mirroring.
5. Tap to turn on the Screen mirroring and select a device.
Note: The TV that you want to connect with must support Lcd mirroring for the above described functionality to work. If it does not support, then you can try the Throw feature. Go to Settings > Throw feature.
How to Activate Camera App and Play Tracks on a LockLcd on Sony Xperia L
LockLcds dont normally allow users to launch any apps or even take photos. We still need to unlock our Lcds to use certain apps on our handset. But with Sony Xperia L, you can take photos, record videos and play tracks without unlocking the Lcd. Heres how you can enjoy this feature on your Sony Xperia L.
To take a photo on a lockLcd
1. Activate first your Lcd by briefly pressing the power key
2. Now activ the camera app
by dragging the camera icon to the left across the Lcd.3. And tap
to take photos or record videos without unlocking your Lcd.To play an audio on a lockLcd
1. Activate first your Lcd by briefly pressing the power key
.2. Now to display the music player controls, drag
to the right across the Lcd.3. And tap
to play a track on a lockLcd.To pause an audio track from the lockLcd
1. Activate first your Lcd by briefly pressing the power key
.2. When the music player controls appear, tap
to pause the track.To change the currently playing audio track on a lockLcd
1. Activate first your Lcd by briefly pressing the power key
.2. Then tap
orwhen the music player controls appear.How to Share Contacts Using NFC on Sony Xperia L
NFC feature is a must-have for any smartphones these days. Near-field communication or NFC works similarly like bluetooth. By touching your NFC-enabled phones against each other, you can then share contacts, music and photos. Well, heres how you can easily share contacts on Sony Xperia L uisng NFC feature.
1. On your device, enable content sharing in Settings.
2. Then go to Wireless and Networks.
3 And choose on More menu.
When the phone vibrates, tap the onLcd message that says "touch to beam".
How to Add a Geotag on a Photo on Sony Xperia L
Adding a location to those photos somehow adds relevance and it gives you that flashback of memories when you view those nicely captured moments. Well, this feature is not new any longer since its been there online and you often use them on photo-filtered websites. But with Sony Xperia L, you can now add geotags on your photos right on your handset. Heres how you can add geotag on your photos.
1. Open your photo gallery on your device.
2. When youre viewing a photo, just tap the Lcd and the toolbars will display.
3. Now tap to open the map Lcd.
4. Find and tap the desired location to put the map on the photo.
5. To adjust the location of the photo, just tap the location on the map to where you want to move the photo.
6. Tap OK when youre done and to save the geotag. You can then return to the photo viewer Lcd.
1. Open your photo gallery on your device.
2. When youre viewing a photo, just tap the Lcd and the toolbars will display.
3. Now tap
to open the map Lcd.4. Find and tap the desired location to put the map on the photo.
5. To adjust the location of the photo, just tap the location on the map to where you want to move the photo.
6. Tap OK when youre done and to save the geotag. You can then return to the photo viewer Lcd.
Subscribe to:
Posts (Atom)